So I wrote a post at the start of this month describing a positive experience with Asus's support involving my netbook that was running Linux. I would like to advise all the other Linux users out there not to make the same mistake I did -
Just because tech support doesn't blame your operating system, doesn't mean they know what they are doing.
To recap what happened, after a little over a year of usage my T101MT up and died. It got a power light, but the screen didn't post any image. The Asus tech claimed that the after market SSD I installed had shorted out the motherboard.
While I thought their diagnosis was odd, I accepted it as I was getting back a working netbook free of charge. Their conclusion was however very wrong. When I got the netbook back I used it for less than three hours (without a hard drive, booted from an SDHC card) when the screen cut out again. This time, I consulted my older brother and he had a brilliant idea (which I can't believe I missed) - lets plug it into an external screen.
And... Poof! It worked.
Thats right, the Asus tech replaced the motherboard without checking to see if the internal display worked properly.
After almost an hour on hold waiting to talk to a manager, I chewed them out a small bit and even got myself free two way shipping. I was promised a different tech would work on the system and was even told me I should send the SSD back so they could reinstall it. It sounded as though the issue was resolved.
Five days later I received an email from the same tech as before informing me that the motherboard was dead again. Well clearly some one at Asus messed up. I called and got a voice of a manager the first time, I left my contact information. 24 hours later I had still heard nothing back, so I called again. This time I got through to someone and they promised to make sure the issue was sorted and would call me back when they had reached a solution.
Two days later I received an automated email telling me the netbook had shipped out again. They never returned my call.
The kicker? They didn't get the computer returned before my classes started like the first manager said they would try to do. In fact, it was returned (finally working) a week after classes started.
In the mean time I have purchased a dell tablet to take my notes on and I plan to sell the Asus once I reinstall a new hard drive in it. I don't think I'll ever be buying an Asus again - it is wrong to tell a customer you are going to return a call and then never do it.
~Jeff Hoogland
Tuesday, August 30, 2011
HOWTO: Linux on the Dell Inspiron Duo
I recently invested in a new toy. A Dell Inspiron Duo netbook/tablet convertable:
I was pleased to see that most all of the netbook was functional OOTB with the 3.0 variation of the Linux kernel my latest Bodhi build was running (including multi-touch on the track pad). I plan to write a full review later on, today however I would simply like to share two tricks for getting some important functionality out of your Dell Duo while running Linux.
Making the Screen Work:
Without a working touch screen the Duo is basically just an over priced netbook. To get the screen working you need to simply add one thing to your grub2 command line. On most distributions you can add the needed command to your /etc/default/grub file. Look for the line that starts with
GRUB_CMDLINE_LINUX_DEFAULT
If this line does not exist, add it. Then add the option usbhid.quirks=0x0eef:0x725e:0x40 to it. Your line should now look something like this:
GRUB_CMDLINE_LINUX_DEFAULT="usbhid.quirks=0x0eef:0x725e:0x40"
Finally, run
sudo update-grub
On your next reboot your touch screen should now be functional.
Adding Key Bindings for Changing Modes:
On Windows 7 the tablet adds a touch layer UI when you switch the laptop into tablet mode. It does this by detecting when the screen changes positions. To add this functionality to Linux you simply need to run the following commands as root -
setkeycodes e073 148
setkeycodes e074 149
Once you have run these commands changing the position of the screen to all the way down (or bring it up) each triggers a different "key press" your desktop key binding manager should be able to address. On Bodhi (or any E desktop for that matter) you can easily configure these key presses to change profile using the enlightenment_remote command. Also worth noting is you will need to run these commands every time you start up your computer. I just added them to my /etc/rc.local file.
Have any questions feel free to drop a comment below and I'll do my best to help you get it sorted out.
~Jeff Hoogland
Friday, August 26, 2011
HOWTO: Create a Debian Meta Package
The following is a short tutorial on how to create a Debian meta package. Just as a brief background for those that do not know what a meta package is - a meta package is a Debian package that simply tells the package manager to download a whole bunch of other packages. Meta packages are useful for allowing for the quick installation of an entire group of packages. I use meta packages in the Bodhi repository for our theme pack and software bundles.
Fair warning for this tutorial I am assuming you have at least some basic command line experience.
Lets start by creating a directory that will have the same name as the meta package we are creating. For the purposes of this tutorial our package will be called "bodhi-theme-pack". So run:
mkdir ~/bodhi-theme-pack && cd ~/bodhi-theme-pack
Next, we need to create a "DEBIAN" directory within our package structure. Note it is required for meta packages that DEBIAN be in all capitals.
mkdir DEBIAN && cd DEBIAN
Then we are going to create a control file inside of our DEBIAN directory.
nano control
In the file that opens paste in this for the contents. The fields in this file are fairly self explanatory. Just note that you need a comma in-between each of the different package names you want your meta package to install. Finally, if you would like your meta package to do extra fancy things, you can also create post/pre install/remove scripts and all that jazz in your DEBIAN directory and they will be executed as with any debian package.
Finally, lets create our .deb package:
cd ~/ && dpkg --build bodhi-theme-pack
You will get a message confirming that the creation of your .deb package was successful and you should now have a "bodhi-theme-pack.deb" sitting in your home directory. If you have any questions or issues feel free to drop a comment below and I'll do my best to help you out.
Cheers,
~Jeff Hoogland
Thursday, August 25, 2011
Five Things the Enlightenment Desktop Does Best
Fair warning, I am a huge fan of the Enlightenment desktop. The following items in this post are things I believe the Enlightenment desktop (and it's developers) are doing better than some of the other open source desktops.
Maintain Old Releases
People are always resistant to change and switching your desktop environment is a major change. When KDE and Gnome both had their last major releases they promptly dropped their previous releases like a bag of bricks. The Enlightenment 17 desktop, while still in development, has been stable and ready for use for a long time now. Even so they have team members that maintain their older E16 release. It is still used (and liked) by many and there are no plans to discontinue it any time soon.
A Focus on Speed and New Features
There is no doubting that all of our modern desktops have been progressing in features and functionality. One spot where Enlightenment excels though is that it has a focus on remaining trim and fast while adding these new features. Don't believe me? KDE 4.x needs around 512megs to be happy, Gnome 3 recommends slightly more at 768 and Ubuntu's Unity desktop requests a full gig!
Someone always pops up and cries out "but our computers are so powerful it doesn't matter" whenever you mention system requirements these days. The fact remains though - it does matter. A desktop that runs fast on a slow system will fly on a quick system. Resources should be there for your applications to use, not for your desktop environment to eat up. Trim as Enlightenment already is, the developers are currently in the process of rewriting all of it's code to utilize XCB to replace XLib - which will make it even faster.
A Flexible Environment
While KDE has a fair bit of configuration options, the developers behind Gnome 3 and Unity have decided that taking control away from the end user is a good thing. I'm sure this denial of user choice is tailored after Apple's OSX - which has about as many configuration options as a Model-T Ford. If you don't let the user customize things they can't possibly break things right?
The Enlightenment desktop doesn't assume it's users are morons and doesn't assume you are using it on a small touch screen device. It gives you the power to do with it as you will. You can leave it at the defaults or configure it to your liking.
Seamless Restarts
Enlightenment can do a full restart of it's desktop environment without affecting the state of any of the currently running applications. While this may not seem entirely useful, this feature is a blessing when your desktop of choice has an "opps" and crashes. I'm sure if Unity or Gnome 3 had this feature it would have saved many users lots of grief in the last few months.
Run Everything Tool
I'm not going to go into everything the Everything tool can do here - but to list a few features it can act as a system menu, quick launcher, web search, file finder and much more.
What do you think? Are any of my points here valid or are they way off point?
~Jeff Hoogland
Wednesday, August 24, 2011
Getting Connected to Illinois State University ISUNET from Linux
This week I started a masters program in mathematics and a job as a graduate assistant at Illinois State University. My laptop is never far from my side, so of course one of the first things I did on campus was connect to the internet.
Or at least attempt to.
There are three main wireless networks at Illinois State University.
isunet - The main network for staff, students and alumni
isunet-guest - A guest network
isunet-setup - A wireless network for "easily configuring your isunet"
I connected to ISUNet-Setup, opened a webrowser and was on my way. It checked my browser for java plugin support (which of course it had) and then I was promptly informed my operating system did not support automatic setup. I was told to contact the Help Desk for the manual configuration instructions.
The page was poorly designed though. It did not provide a link to Help Desk website or provide a phone number. After finding the website via Google on my N900, I noticed they had a search function. I was shocked to find that searching "linux wireless" did not yield any results. In fact even searching simply "linux" did not find anything in any of their pages.
What a shame.
Being the persistent person that I am (and having an hour to kill before class). I marched myself on over to the help desk building and found their main office. The person behind the desk was fairly friendly and actually ended up being fairly useful. Our conversation went something like this:
Me: "I need the manual configuration instructions for ISUNet."
Him: "Are you sure? Are you running Windows or Mac?"
Me: "Linux."
I was slightly surprised at this point, normally saying that "L" word to customer support for tech trips them up a whole lot, this guy seemed to know his stuff though.
Him: "Oh, well the setup will vary with your system - but what you are looking for is WPA2 Protected EAP (PEAP) in your security settings. Once there just use your ISU login for the user name and password."
He jotted down what he said on the back of a piece of paper. I nodded, took the notes and was on my way.
Once I turned my laptop back on, I discovered connecting was fairly simple using the Gnome desktop's nm-applet (which is what Bodhi Linux and a number of others also use). You simply click on the network manager icon and select isunet, after clicking this a security window will pop up, automatically detecting the Security type. You will however need to change the Authentication setting to use PEAP (I think mine defaulted to TLS).
Towards the bottom of the main window, there will now be a spot for entering a user name and password (after selecting PEAP). Here, you enter the same thing you use to log onto iCampus. After filling in this information, hit connect and you should be on your way.
Needless to say this setup is not hard if you know what you are doing/what you are looking for. What is disappointing though is that these simple settings are not found anywhere on the ISU tech help website (or anywhere I could find on Google for that matter). I know for a fact I am far from the only Linux user at ISU - I saw someone using an Ubuntu powered tablet in one of my classes already :)
Cheers,
~Jeff Hoogland
Saturday, August 13, 2011
HOWTO: Easily Share Files between Linux Machines using sFTP
Sharing files between two different computers on a network is something that I feel is often harder than it should be. Maybe it is just my bad luck or some poor configuration settings on the various networks I connect to, but Samba shares seem to almost never work for me. In the past year I've taken to using sFTP to transfer files back and forth between my various devices. sFTP is nice because it works over the internet and with any Unix devices that support ssh (including the N900)
For the purposes of this tutorial I am going to refer to the machine we are connecting from as "Machine A" and the machine we are connecting to as "Machine B". I am assuming the two machines are both connected to the same local network.
Getting Started -
To get started you will need to install the OpenSSH server package on Machine B. On Debian based systems (including Bodhi, Linux Mint, and Ubuntu) you can install this package by running the following in terminal:
sudo apt-get install openssh-server
On Machine A you will need to install a program for accessing Machine B. My program of choice is Filezilla, however you can use any program that supports the sftp protocol. If Machine A is Debian based you can install Filezilla with the command:
sudo apt-get install filezilla
Finding Your IP Address -
Next, you will need the IP address of Machine B so you can connect to it. If you are using the Gnome network manager (nm-applet) you can right click on the applet and select "connection information". The IP address is listed as the first line under IPv4:
You can also find your IP address via the command line on Machine B with the following command:
sudo ifconfig | grep "inet addr"
Connecting the Machines:
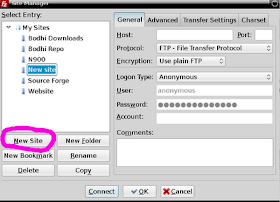
Finally, go ahead and load up Filezilla on Machine A. Selecting File - Site Manager. In the window that appears select "New Site" and enter the name of the system you are connecting to.
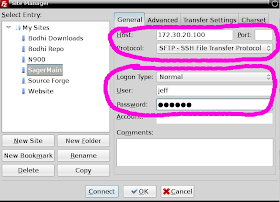
Then, where it says "Host:" enter the exact IP address we found in the step above. In the box where it says protocol click on the drop down and select "SFTP". Under "Logon Type:" you want it to say "Normal". "User:" is the exact, case sensitive, name you use to log into Machine B with and "Password:" is that user's password.
Finally, just tap the "Connect" button at the bottom of the site manager and you should be good to go. You can then simply drag and drop files between the two systems using the two pane panel Filezilla provides.
Have any questions or if any issues arise feel free to drop a comment below and I'll do my best to help you along.
~Jeff Hoogland
Tuesday, August 2, 2011
Set Penguins Crawling on your Desktop!
There are a lot of great Enlightenment modules out there. Today I would like to feature one that is far more fun than it is useful. It is called simply "penguins" and it sets your choice of Penguins (or Lemmings!) crawling all over your desktop and interacting with your windows.
Like everything in the Enlightenment desktop, the module is fairly configurable. You can define the number of penguins you want on your desktop, their size and how transparent they are.
The following is a short demo video I recored of the module in action (P.S. Sorry for the distortion on the first ten seconds, something odd with the video file I uploaded to youtube):
Fun huh? For those interested in trying this on their own Bodhi desktop I have just uploaded this module to our testing branch this evening. It will make it's way into the main repository in a few days hopefully. If you don't want to wait the .deb can be got from here.
Cheers,
~Jeff Hoogland
Monday, August 1, 2011
Asus Support - Excellent and Linux Friendly
I've been recommending Asus computers to friends and clients for some time now. After my recent dealing with the Asus support/repair center I will continue to recommend them for the foreseeable future.
It is rare that I keep whatever computer I have for more than a year's worth of time. Because of this I had never, until last month, had to RMA an entire laptop. It just so happened that last month my Asus T101MT (that I have been very happy with) up and died on me. I was using the system when the screen just cut out. I pressed and held the power button, waited a moment and then fired the system back up.
I had some extra sticks of DDR2 memory laying around so I tried swapping those out before I called in for an RMA. No luck there. So I looked up when I had purchased the netbook only to discover it was one whole month out of the warranty.
I'd heard stories from fellow Linux users about companies not honoring hardware warranties, unless Windows was reinstalled on the system. It's wrong, but it does happen. I called up the Asus support line and after jumping through a countless number of automated menus I arrived at someone who could help me. After being walked through a few id-10-t checks the person on the phone agreed with me that the unit needed to be sent to a repair center. It's didn't matter that the system was running Linux, it was a clear hardware issue.
I mailed the laptop out and a few days latter I received a call from the Asus repair center. This is where I was further impressed with the Asus quality of service. Not only where they going to honor the warranty even though it was a month expired, but they discovered that the SSD I had installed in the system the week after I bought it had died and shorted out the motherboard with it. They offered to let me mail them the original 160gb hard drive to install into the unit with the replaced motherboard, but I opted to instead simply have them mail me a working hard-drive-less netbook. They also sent me back the bad SSD so I can get it RMAed (last time I will ever buy an ADATA product again).
So in short I was very impressed with Asus quality of service and they will have the continued support of this Linux user. I received the system back last week and it is working great! Much to my joy they even extended the hardware warranty for me an extra 3 months.
~Jeff Hoogland
It is rare that I keep whatever computer I have for more than a year's worth of time. Because of this I had never, until last month, had to RMA an entire laptop. It just so happened that last month my Asus T101MT (that I have been very happy with) up and died on me. I was using the system when the screen just cut out. I pressed and held the power button, waited a moment and then fired the system back up.
Nothing, nada, not even a bios screen posted.
I had some extra sticks of DDR2 memory laying around so I tried swapping those out before I called in for an RMA. No luck there. So I looked up when I had purchased the netbook only to discover it was one whole month out of the warranty.
Wonderful.
I'd heard stories from fellow Linux users about companies not honoring hardware warranties, unless Windows was reinstalled on the system. It's wrong, but it does happen. I called up the Asus support line and after jumping through a countless number of automated menus I arrived at someone who could help me. After being walked through a few id-10-t checks the person on the phone agreed with me that the unit needed to be sent to a repair center. It's didn't matter that the system was running Linux, it was a clear hardware issue.
I mailed the laptop out and a few days latter I received a call from the Asus repair center. This is where I was further impressed with the Asus quality of service. Not only where they going to honor the warranty even though it was a month expired, but they discovered that the SSD I had installed in the system the week after I bought it had died and shorted out the motherboard with it. They offered to let me mail them the original 160gb hard drive to install into the unit with the replaced motherboard, but I opted to instead simply have them mail me a working hard-drive-less netbook. They also sent me back the bad SSD so I can get it RMAed (last time I will ever buy an ADATA product again).
So in short I was very impressed with Asus quality of service and they will have the continued support of this Linux user. I received the system back last week and it is working great! Much to my joy they even extended the hardware warranty for me an extra 3 months.
~Jeff Hoogland
Why the Tablet Craze?
I made a post last year titled "The Year of the Tablet Computer". It is now over half way through 2011 and it seems the touch screen craze is far from over. Apple has released the second iteration of their iPad, we are up to our ears in Android tablets from various hardware makers and a Meego tablet or two might still exist before the year is up. I've played with the iPad a bit, I've used more than a few different Android tablets (I even own one for purposes of developing Bodhi for ARM) and I must say I'm confused what all the hype is about.
Beyond my Android tablet I own several other computers including a Sony Vaio Laptop, a Sager Laptop, an Asus Netbook and a Nokia N900. I've had the Android tablet for around a month now and I've found myself reaching for any of the other computers when I need to get something productive done. Even something as basic as light webrowsing just feels easier/more natural on a computer that has a keyboard on it. I know this is partially because of what I am accustomed to, but I find it annoying when I am using a device that already has a ten inch screen (or smaller) to have a keyboard popping up that takes up nearly half of it!
Now, I am not saying tablet computers are all bad. In fact if you are looking to take digital hand written notes they are an excellent tool. Other than this I have yet to come across a practical application a tablet does more effectively than any netbook computer. If you know of one - please enlighten me. Of course there is more to computers than just productivity as many of us know. Games can be a wonderful use for tablet computers. In fact I think half the time I spend using my tablet is when solitaire or some other touch-focused game is at hand.
In closing, I think tablets are great novelty items. If you have an extra few hundred dollars laying around and want a new toy - go ahead and pick one up. Just don't expect it to magically change your life or make it easier like many commercials would have you think. For purposes of getting work done a netbook is much better suited for those looking to own a tiny computer.
~Jeff Hoogland