Monday, December 23, 2013

AT&T Connect to Cell System Review

This is a post written by me on behalf of Advanced American Telephones. All opinions are 100% mine.

My wife and I moved into a new townhouse a few months ago and our current cell phone provider (T-Mobile) does not get the best service in our new home. We have found a few spots in the house that get reception, but the rest of it is a giant dead zone. The basement is absolutely out of the question for reception, which I believe is likely an issue for a lot of people.

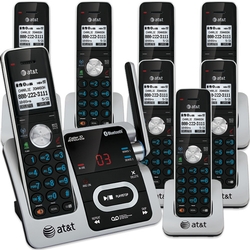
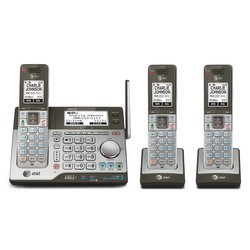
This past week we acquired a Connect to Cell System by AT&T (CLP99383) and so far we are very impressed with the results. The system is reminiscent of the average landline cordless telephone system but it integrates with cellular devices. Our system includes the main base, two additional charging bases, and three cordless handsets.

CLP99383

This system seems to have solved the biggest issue with our mobile devices - no service. The system uses bluetooth technology to connect the mobile device to the phone system. We simply have to leave our cell phones in a non-dead zone in the house and then we can use the handsets anywhere else in our home to send and receive calls using our mobile numbers/plans.

Ease of Setup: While my wife is by no means technology-illiterate, she had the system set up and working in just a few minutes without reading the instruction manual. The menus are intuitive and display on-screen instructions when connecting a device via bluetooth. The system supports being connected to up to two mobile devices at once (and a landline if anyone still has one of those).

Not Carrier/Device Exclusive: The system is AT&T branded, but worked with our T-Mobile devices and a friend's Verizon device seamlessly. Further, the system didn't have an issue working with my wife and friend's newer Android devices or my older Nokia N900. So long as your mobile supports a bluetooth headset it should work with the connect system.

Push to Talk Feature: The handsets and base are equipped with push to talk technology, creating an intercom system/walkie talkies for the house (It will be great not having to run up two flights of stairs to have a quick conversation).

Does not improve cell reception: The unit does not increase the reception that we receive in our house, so our phones still only work in certain areas, however the simple solution to this is that we have the base unit set up in an area where we do receive good reception and we leave our mobile devices next to it when we are home. The connect base even has a USB charging port built into it so our mobile doesn't run out of power while connected.

We then have the other units on the other two floors of the house. Leaving our mobile devices near the base ensures a good bluetooth connection (the instruction manual advises a 15ft. maximum distance)

Connect to Cell App: For Android devices, there is an app available in the Google PlayStore called "Connect to Cell." When used, the system will create an alert whenever your mobile device receives a text message, email, or social media update.


Additional Handsets: My home only has three floors, so I only have two extra handsets in addition to the base. If you have a need for more handsets than this the system supports connecting up to twelve at once.


Closing: Over all I am pretty happy with the Connect to Cell system. It allows me to have the feel of a traditional home phone system without having to pay for an additional service. It also provided a clean solution to having a lack of reception in certain areas of my house.


Cheers,
~Jeff Hoogland

Visit Sponsor's Site

Sunday, December 22, 2013

eAndora - Pandora Internet Radio Client - 1.0 Release

At the start of this year I posted about eAndora, a Pandora Internet Radio client I was working on that is written in Python and Elementary. Today I'm happy to announce that eAndora is finally feature complete enough for me to stamp something as a "1.0" release.

You will always be able to find the latest eAndora source release on source forge here. If developmental code is more your preference you can always find my latest work on github here.

I've tested this release with the latest releases of the Enlightenment Foundation Libraries (1.8.3), Elementary (1.8.2), and Python EFL (1.8.0). It could very well work with previous releases of these things though - for best results always use the latest versions.

Screenshot Tour:

Login Screen

Main Window

Station Creation

Station Selection

If you have any questions feel free to drop a comment below. If you are a Bodhi Linux user the eAndora 1.0 release is currently in our testing repository and will move into the stable branch in January once the EFL 1.8.x series makes its way to stable.

~Jeff Hoogland

Sunday, December 1, 2013

HOWTO: Watch Netflix on Bodhi Linux

Not being able to utilize the Netflix video streaming service has been an issue on the Linux desktop for the past few years. This is due to the fact that Netflix utilizes Microsoft's Silverlight technology for video playback.

For the last few months though we have been able to watch Netflix in our native browsers on Linux using a Wine pluggin wrapper called Pipelight. Today I would like to walk you through the short process of using Pipelight to watch Netflix under Bodhi Linux.

Step 1 - Install Chromium or Firefox

Pipelight needs Chromium or Firefox to work. So if you are still using Bodhi's default browser Midori - you will need to install one of these other two browser. You can obtain your browser of choice by clicking on one of the links below:


Step 2 - Install Pipelight

Next we need to install the Pipelight plugin by clicking on the link below:


Pipelight depends on the Microsoft corefonts package. This means that if you do not already have these fonts installed they will be installed as part of the installation of Pipelight. When installing these fonts you need to agree to an EULA, to navigate to the Accept button you will need to use the tab key, and then press the enter button to select it.

Step 3 - Setup a User Agent Changer

The User Agent is a little code in your browser that tells the page you are viewing what browser you are using. In order for Netflix to even offer us the Silverlight player it needs to think we are on Windows. To do this we install a user agent changer browser plugin. Install the proper plugin linked below for your browser:


After you have the user agent changer installed - set your browser to detect as "Windows Firefox".

Step 4 - Watch Netflix!


Step 5 (Optional) - Add Netflix to the Permanent Spoof List

If you are like me then you hate having to manually click a button and change your user agent string back and forth every time you visit the Netflix site. Thankfully the User Agent Switcher for Chromium as a "Permanent Spoof List". Simply add the URLs shown in the image below to identify as Windows Firefox 3.5 (note the * at the end of the URLs - it is important):


Enjoy! If you have any questions or issues feel free to drop a comment below or open a support request on the Bodhi user forums.

Cheers,
~Jeff Hoogland