A little over a week ago I posted about the first draft of my Qute MTG Stats tool. This past weekend I had some time between matches of magic to implement some new ideas I had for the project. These include:
Adding notes to events such as deck played and decks played against
See stats by deck for decks you've added to the event list
Export event/opponent lists to CSV files
Export full stats to clipboard/text file
Save edited data to a .qute file
Load data from a selected .qute file
Added prompts to let the user know when actions complete successfully
Added in application help prompt
I've also moved away from the original tabbed setup I started with to separate to allow the user to view information side by side:
For those interested in giving this a try yourself, you can always download the latest Windows binary form here. For those using a superior operating system, simply install pyside, download the latest snapshot, and run the qutemtgstats.py
If you have any suggestions or feature ideas let me know with a comment below.
Late last year I wrote an Excel workbook that you could use to analyze your Magic the Gathering match history using VBA. While it was functional, being contained in an Excel workbook meant my tool was tied to closed source software and was limited by the bounds of Excel.
For those interested in giving my tool a try, you can find install and usage instructions here.
The main thing I am looking for is suggestions on how to improve this tool. What information would be useful to provide that can be scrapped from the data provided in our DCI history? If you have any ideas or find any bugs drop a comment below or open up a ticket on GitHub!
Something I've spent a few hours on in the last month is a small python library, that I am calling PyPair, that allows you to easily manage a Swiss-System Tournament. For those unfamiliar with this concept:
"A Swiss-system tournament is a non-elimination tournament format. There are several rounds of competition, but considerably fewer rounds than in a round-robin tournament, so each competitor (team or individual) does not play every other competitor. Competitors meet one-to-one in each round and are paired using a predetermined set of rules designed to ensure that as far as possible a competitor plays competitors with the same current score, subject to not playing the same opponent more than once. The winner is the competitor with the highest aggregate points earned in all rounds."
A short example of using PyPair:
from pypair import Tournament
Players ={1:"Tim",2:"Jeff",3:"Kristi",4:"Jacob",5:"Doug",6:"Karen",7:"David"}
to = Tournament()for player in Players:
to.addPlayer( player, Players[player])
pairings1 = to.pairRound()print pairings1
Yields the output:
{1: [1, 7], 2: [2, 6], 3: [3, 5]}
Which is a simple python dictionary where each key is a table number that corresponds to a list of the players playing at that table.
If you would like to see a more complex example see here.
If you are interested in the math behind the pairings, PyPair essentially does the following when you call the pairRound() function:
Group players by point totals Starting with the group who has the most points:
Create a graph with all players in current point total
Connect players in the graph that have not played yet
When I buy a piece of hardware I generally use it until it becomes completely non-functional. Because of this, my old Sager laptop I bought five years ago was finally needing an upgrade so I set about doing research trying to find a replacement.
I was looking for something powerful to stream some games on, but also light enough that it was not going to feel like a brick next to my Chromebook. Since Linux is my OS of choice, having reasonable Linux support is also on my list of desires. Because of this I wanted to stay away from ATI graphics cards and nVidia cards with optimus.
The winner you ask? After a good deal of research it ended up being the Sager NP2740:
The Hardware
The NP2740 ended up being one of the few pieces of hardware out there that met all my specifications. At 4.2 pounds the NP2740 is just a small bit heavier than my HP14 Chromebook. When ordering from PowerNotebooks.com the hardware also came with a no-OS option.
One of the things that draws me to Sager laptops is how customizable they tend to be compared to other laptops. The few pieces of hardware on the NP2740 that have to stay as is are:
That leaves us the memory and storage space to customize. The memory comes stock at 8gigs, but for my system I opt'd to push the memory to the maximum 16gigs as I knew I would be running virtual machines on my system.
Storage space is the one place where the NP2740 really comes out ahead of other laptops in this form factor. In addition to have a standard 2.5" mobile drive, the NP2740 also has an mSATA slot that you can add an SSD to. Personally I have a 240gig, Intel 530 SSD in my unit.
The Performance
On a system this powerful I never expect a reasonable battery life, so I was fairly surprised with the NP2740. When under a constant heavy load (virtual machines running, code compiling, audio going) the battery in the NP2740 lasts for just under three hours. While doing light office work that life extends to around five hours.
In terms graphics performance I must say I have been thoroughly impressed with the Intel Iris 5200. For specifics on performance you should see the benchmarks here, but I will say this little card has handled everything I have thrown at it - including streaming some of those games using OBS.
Most importantly - the cooling on the laptop is excellent. I can use the device on my lap for hours without any discomfort from heat discharge.
The Linux Support
Starting with Ubuntu 14.04.1, all of the hardware on the Sager NP2740 is functional by default. If you are using an older Linux distro the RTL8723BE wireless chipset might give you some trouble, but there are workarounds. Because the graphics chip is Intel based you should have full 3D support with the open source drivers present on most Linux distros.
Best of all is that I was able to get the hardware with no OS pre-loaded, so I did not have to pay a premium to get a copy of Windows with my new laptop.
The Wrap Up and Price Point
I always do a lot of research before making a large purchase and I must say that even after days of research the NP2740 blows all the other competition away. Even with my wife's company discounts, other brands such as Dell, Toshiba, and Lenovo could not come close to the $1,300 I ended up paying for the NP2740. You can configure your own starting just under $1,000.
All in all I have been very happy with my Sager NP2740. If you are in the market for a Linux PC that is portable, but does not sacrifice performance - this might just be the laptop for you.
I am what you could call a practical free software advocate. This means that while I love open source software and everything it stands for, at the end of the day I really just need a computer that works for the tasks I need accomplish. Most people in the world are exactly like me, except they don't care in the slightest about free software. They just want a computer that works.
That is why things like Netflix and Steam officially supporting Linux as a desktop operating system is so important. You will get a lot more users who are willing to try an alternative OS when it does not require them to give up using the services they love to do so.
So do me a favor - stop complaining. Every time I see one of these large services start supporting desktop Linux, the complainers come out of the wood work with something else to whine about. With Steam it was DRM in the games that now ran natively. With Netflix folks are complaining about it requiring the use of Google's branded Chrome browser.
The truth is, change is gradual, but it is coming. So the next time a major content creator/provider opts to add support for our operating system of choice - lets just say thank you instead of complaining about the way in which they are adding that support.
The "year of the Linux desktop" is not something that is just going to magically happen when the clock strikes twelve at midnight on January first. It is something that is going to happen slowly over years worth of time. The addition of services like Netflix and Steam are fantastic wins in this slow change.
Today I would like to share a simple solution to a problem I have wasted several hours on in the last week: Listening for key presses on Linux using Python. You see, on Windows you can simply use the pyHook library that has existed for years. On Linux no such library is as well documented.
After posting my question in several forums I finally was able to track down a reasonable, fairly simple solution. Contained in the Simple Python Keylogger is a pyxhook.py library that is desktop independent and GUI toolkit neutral.
To hopefully save future python developers some time in the future I've created a GitHub repository for just pyxhook and a simple example of how to utilize it:
#Libraries we needimport pyxhook
import time
#This function is called every time a key is pressseddef kbevent( event ):#print key infoprint event
#If the ascii value matches spacebar, terminate the while loopif event.Ascii ==32:global running
running =False#Create hookmanager
hookman = pyxhook.HookManager()#Define our callback to fire when a key is pressed down
hookman.KeyDown = kbevent
#Hook the keyboard
hookman.HookKeyboard()#Start our listener
hookman.start()#Create a loop to keep the application running
running =Truewhile running:
time.sleep(0.1)#Close the listener when we are done
hookman.cancel()
One of my goals for this year is to become proficient in a cross platform GUI tool kit. The toolkit I've chosen to get my hands dirty with is Qt because in addition to being cross platform it also has a fantastic amount of documentation.
I always find I learn programming easier when I am building some practical instead of going through various tutorials that you just throw away when you are done. So with that, my "learn Qt" project is something I'm calling qAndora:
qAndora is a cross platform, open source, Pandora Internet Radio client written in Python using Qt and VLC. If you would like to jump right to giving this little application a try you can find install instructions here. I have tested the player successfully on Ubuntu 14.04 and Windows 7, but it should work anywhere you can install VLC and run Python.
A few other random screenshots of the tool:
If you have any suggestions or feature requests please feel free to leave them in a comment below.
A week ago I posted that I was stepping down from my position as doing the primary development work for the Bodhi Linux project. I just wanted to clear the air that this change does not mean that the project is shutting down. In the previous post I ask for folks looking to help and since then I have talked to a number of different people and currently have a few different people working to take over my previous duties.
So let me make one thing clear for worried folks:
Bodhi is not dead and a 3.0 release will be happening still.
New timelines are still being figured out and when the new folks working on development have their footing fully underneath them they will be sharing more information I am sure. As for myself, I will still be sparing enough time to the project to field questions the new folks might have and provide insights wherever needed - I just won't directly be doing the heavy lifting any longer.
I am sure anyone who has been following the Bodhi project has taken note that the 3.0.0 release timeline has not happened as expected. Due to a variety of reasons I would like to announce today that I will no longer be actively developing Bodhi Linux.
Bodhi has been a labor of love for me that was started nearly four years ago. In that time all of the other original team members fell away. In fact I have worked with dozens of different people over the course of the last few years. I have made friends and learned more than I could have ever imagined.
With that being said, even though I no longer have the bandwidth to actively develop Bodhi, I know many enjoy using the project. So if you are reading this and have an interest in picking up where I am leaving off, please contact me. All Bodhi related code can be found on my GitHub page and I am more than happy to help guide you in the right direction with how things work as you are getting started.
To our users out there, thanks to your amazing support earlier this year our existing servers are paid for through the end of April 2015. So even if no one chooses to pick up where I have left off, your existing systems will continue having repository access until this time. Edit: Bodhi isn't dead, just changing hands.
All in all, it has been fun. I started Bodhi during my senior year of undergrad and have continued to guide it through moving three times, graduate school, getting married, several different jobs, and even my first wonderful kid:
I'd like to close with saying thanks to the Bodhi and open source community as a whole. In general you have been very supportive of the small project I started to Enlighten the world.
At Bodhi we work firmly on a "its ready when its ready schedule" as opposed to sticking to our set release goals and churning out something we are not happy with. Better late than never as the saying goes! Just ten days after the targeted release date I am happy to share our first Release Candidate for Bodhi Linux's third major release:
As you can see from the image our default theme has matured some (it is nearly complete in fact). For a full change log you can see my running TODO list as we work towards our 3.0.0 stable release here.
The most important new thing in this release is the addition of an ISO image that supports legacy hardware. The legacy ISO image features a 3.2 kernel that will work on 486 machines (or newer), including non-PAE hardware. This ISO image currently features the same E19 desktop that the other three discs have, but if all goes as planned the legacy disc will feature the E17 desktop by default starting with our second release candidate.
Existing 3.0.0 Users Can Upgrade
As always existing 3.0.0 users can simply use eepDater to get the latest and greatest system from their current install. 64bit users will need to implement this workaround though for a troublesome package that found its way into the beta.
Known Issues
There are a couple of small issues we are aware of and working to remedy for our RC2 release later this month. They are:
The quick start guide opens twice on the live CD/the first time you boot Bodhi
There is an Enlightenment segfault the first time you access the menu on the live cd/on a new install (just press f1 and everything is fine)
App Center does not work (we are still working on implementing a new installer tool for this)
Bug Reporting/Issues As always please, please, please do not post issues in a comment on this post. Instead open a thread in the 3.0.0 testing section of our user forums. Also keep in mind this is a testing release not intended for production machines.
Its been two months since we had our alpha release and since then Ubuntu 14.04 has released as "stable". That means the core for our upcoming Bodhi 3.0.0 release is finally stable enough for me to stamp a "beta" label onto it. For those that do not really care what I have to say and just want a download link, this beta release comes in the following three flavors:
Those looking for a change log / my TODO list for 3.0.0 please see here. All of these images are built directly on top of the latest Ubuntu 14.04 packages. The 32bit and 64bit images utilize the 3.13 Linux kernel, while the Chromebook image utilizes a 3.11 kernel due to hardware compatibility issues.
The Chromebook image is tested/designed to work with the Acer C720 and HP 14" Chromebooks. It could very well work with other Chromebooks, but they have not been tested. For more information on installing Bodhi on your Chromebook follow the directions here.
Updated Release Schedule
Some folks made note that when I first posted the Bodhi 3.0.0 release schedule we were set for a stable release at the end of June. After some discussion on our user forums it was decided that we would all be more comfortable with waiting till after Ubuntu releases their first major update to 14.04 before we called 3.0.0 our "stable" Bodhi release. With this in mind the Bodhi 3.0.0 stable release has been moved from a June 27th target date to a August 2nd target date. This makes our release cycle heading towards 3.0.0 stable look like:
May 30th - Release Candidate
June 27th - Release Candidate 2
August 2nd - Stable Release
New Look and Applications
While I a linked a change log above, a picture is worth a thousand words as they say! Below is pictured the new Radiance Enlightenment theme that is nearing completion (Thanks Duma!) which is now the default look for Bodhi 3.0.0. Also shown in the screenshot is ePad text editor (replaces Leafpad) and eepDater system updater.
Bug Reporting/Issues
As always please, please, please do not post issues in a comment on this post. Instead open a thread in the 3.0.0 testing section of our user forums. Also keep in mind this is a testing release not intended for production machines.
I recently picked up a Chromecast and one of the things I was looking for was to stream Twitch.tv from my laptop to my TV using the device. Thankfully setting this setup is fairly simple thanks to the aide of the TCast Chrome plugin.
Step 0 - Install Chrome/Chromium
Streaming to the Chromecast from your PC currently requires a Chrome based browser. Install either Google Chrome or Chromium.
Step 1 - Install Google Cast and TCast Extensions
Select each of the addon links below and add them to your browser:
Step 2 - Enable Streaming from your Channel of Choice
Open the twitch.tv stream URL you want to cast to your Chromecast. Play your stream and then click the Chromecast button underneath the video player. You will then see the following appear over your stream:
Next, click the Chromecast icon in the upper right hand corner of your browser and select the Chromecast device you want to stream to:
Your Chromecast should then take a minute to load up the stream and then it should soon be playing! In your browser page you will then see the following screen from which you can adjust the stream quality and play/pause the stream:
And you are all set - enjoy streaming twitch on your Chromecast device! Have any questions or issues please feel free to leave a comment below and I'll do my best to help.
I've only tested the above instructions on my Linux based PC, but these extensions should work on any platform that supports Chrome/Chromium.
Most folks who have been around Linux and/or open source software for awhile are aware of what GTK and QT are - tool kits for building applications. Something that not as many may be aware of is that there is another open source tool kit out there - the Enlightenment Foundation Libraries. These serve as the building blocks not only for the Enlightenment desktop, but also for a growing number of applications.
Today I am going to provide a quick round up of applications written utilizing the Enlightenment Foundation Libraries. System Tools -
Terminology brings "fun" back to the terminal while still being plenty practical. Supporting split panes and slew of other nice features it is stable and fast.
A simple graphical tool for the sudo command. Supports the same functions as similar tools such as gksudo. Also supports direct integration with other python EFL applications.
eCcess provides a few different functions. It is a GUI for managing users on the current OS and assigning/removing group permissions. It can change the current date and time and finally it provides a simple task manager.
Hopefully I've introduced you to some new wonderful applications today! Most of this software is fairly new though, so sadly many of them will not have packages in many Linux distribution's repositories. You can however find every application listed here in the Bodhi 3.0.0 repos (or you can add this repo to your Ubuntu 14.04 install).
If you know of an awesome EFL based application that I haven't included here today - please let us know what it is - and where to find it - in the comments below.
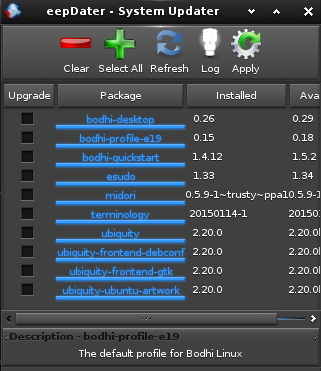
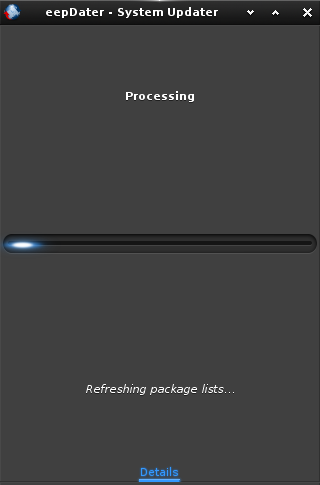
One of the things I am working on for our Bodhi 3.0.0 release this summer is a simple GUI system update tool written in Elementary and the Enlightenment Foundation Libraries. Today I would like to share an early version of this tool I am calling eepDater (pronounced epp-date-er), which is written in python utilizing the EFLs.
eepDater provides a very simple, but functional, GUI for selecting which package updates you'd like to install on your computer via apt-get:
You can simply check the box for the updates you'd like to install and then hit the apply button. Hitting refresh will check for package updates:
One thing worth noting is that eepDater does not include any code for escalation of privileges for installing software. This means you should launch it with something such as eSudo.
If you are using at least Bodhi 3.0.0 you can install eepDater on your system with the command:
sudo apt-get install eepdater
For anyone else out there, you can find the eepDater source code on GitHub here.
Have any questions or suggestions feel free to drop them below! Keep in mind though this tool is intended to be simple by design.
One question we often had users ask us in the past was if it was possible to convert an existing Ubuntu LTS install into Bodhi Linux. Previously the answer to this question had always been "No", but with our 3.0.0 release built on top of Ubuntu 14.04 we are finally looking to change this. The following is how you can add the latest Bodhi desktop to your existing Ubuntu 14.04 install.
Step 1: Add the Bodhi Repo to your Sources
Open a terminal and run:
sudo nano /etc/apt/sources.list
At the bottom of the file that is opened, add the line:
deb http://packages.bodhilinux.com/bodhi trusty main
Step 2: Sync package lists
Next you will need to sync your package lists with the command:
I've kind of been on a Chromebook kick lately. Last month I posted a review of the Acer C720 I picked up recently, to summarize: I really love the device.
I think computers like Chromebooks are the way of the future, but not because of their operating system - because of their hardware. Relatively low cost laptops with SSDs for storage and an insane battery life are everything I want in a computer.
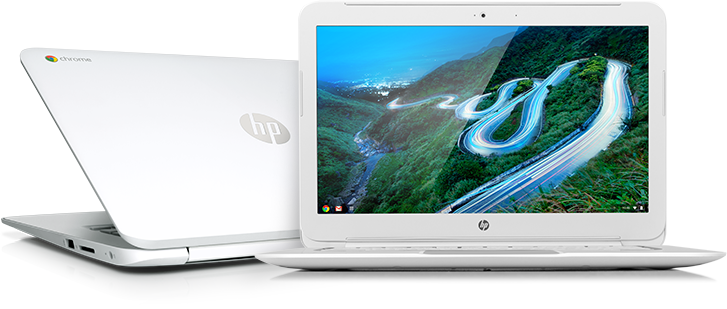
I liked the hardware specs of the Acer C720 so much, I've decided to replace not only my old netbook with a Chromebook - but I've replaced my primary work laptop with one as well. I picked up an HP 14" Chromebook this past weekend which has identical hardware specs to the Acer C720, while providing an even longer battery life:
Since I started posting about these laptops and my work with Bodhi Linux on them I've had piles of Linux users ask me why I am buying Chromebooks with the intent of running something other than ChromeOS on them.
This question is VERY hypocritical.
Some even go so far as to recommend "traditional" laptops that would have been a better choice. Guess what operating system these traditional laptops come with? You guessed it: Windows! Buying a Chromebook with the intent of installing a different Linux distribution on it is no different than purchasing a Windows laptop with the same intention.
Well, I guess it is a small bit different. You see - when I buy a Chromebook not only am I not paying a Windows tax for my hardware, but I am getting a laptop with a sleek form factor that gets an amazing battery life. To get these things from a Windows PC you generally have to pay a giant premium.
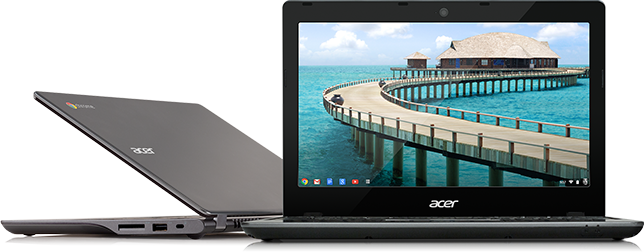
In closing, if you are in the market for some sleek Linux hardware at a low cost I would highly recommend checking out the Acer C720 or the HP 14" Chromebooks.
As promised I've put together our first Bodhi Linux disc that is built on top of the upcoming Ubuntu 14.04 release. Keep in mind this is a very early image not intended for production machines. There will be issues.
That being said, we are very interested in user feedback on our first couple pre-release discs for this version. Because we have a new major release we are trying a few different things that we want your input of. Features of note in this 3.0.0 alpha image that different from our Bodhi 2.x.y base:
Ubuntu 14.04 base
E19 pre-release replaces E17
No more manual profile/theme selection at start up
eConnman replaces nm-applet
Pulseaudio replaces alsa as the default audio system
Matrilineare replaces MaXo-Remix as the default icon set
LightDM replaces LXDM as the display manager
eSudo replaces gksudo
A few screenshots:
Login Screen
Default Desktop
Applications
The best place to give feedback regarding this release is in our 3.0.0 pre-release forum section. Let us know what you think about these changes or let us know if you have suggestions for improvement. For this first release I've only prepared a 32bit PAE enabled ISO image. Starting with our beta release next month we will provide a non-PAE, PAE and 64bit disc image like we do for all official releases.
Just a quick update to let folks know about a few updates our special installers for Bodhi Linux on Chromebook hardware.
Acer C720 Chromebook
I've updated the special ISO image for the Acer C720 which I give instructions for installing here. Updates to the disc include fully functional suspend, automatic audio switching over HDMI, and an E17 profile that enables all the function keys on the Chromebook to work as expected:
You will note in my screen shot above that there is also a bluetooth icon on the system tray. I've opted not to include this by default because I know many won't have a need for it. If you want to use the bluetooth on your C720 simply run the command:
sudo apt-get install blueman
And then use the GUI that is installed to connect to/interact with your blue tooth devices.
Samsung ARM Chromebook
Find instructions for installing Bodhi on the Samsung ARM Chromebook here. While I was busy implementing many improvements to the Debian Wheezy based ARM file system, one of our forum members had been working on a Debian Jessie based file system. Late last month he finished it up to essentially get the hardware fully functional under a true Linux OS!
When you run our installer script you are now asked if you want to use the stable or testing release - I would highly recommend selecting the testing release at this point. It includes the same Chromebook specific profile I pictured above for the Acer as well as full OpenGLES support.
The installer script now provides detection for a previous install on the target disc and over writes it (as opposed to making the user manually remove their old install). Another new feature of the installer is support for different install targets. Simply provide the install target as the first argument for the installer script and you can easily run Bodhi on your Samsung Chromebook from a USB flash drive or SD card.
HP 14 and Lenovo X131e
Also - nothing for these guys yet, but I am hoping to pick up an HP 14 sometime this week and get Bodhi going on it. Our same team member who did all of the wonderful improvements to the Jessie filesystem for the Samsung recently picked up a Lenovo X131e and has started work on dual booting this with Bodhi. I will post updates about these when we have something substantial to share.
Wrapping Up
As always, if you run into any issues please open a support request on our user forums as opposed to posting a comment below.
First things first, this is not a tutorial for getting your audio working over your HDMI if it isn't already. This assumes you already have audio over HDMI working via PulseAudio, but currently have to manually assign the new output after attaching your HDMI cable.
TL/DR
If you are using a Debian based distro and don't care about the details of how this works, then you can simply install the .deb file I've prepared here. After that finishes installing you should be good to go - attach your HDMI cable and the system should automatically switch from playing over the speakers/headphones to piping audio over the HDMI.
The Details or How we make things work on not Debian
How this works is a combination of PulseAudio, Bash, and a little bit of udev.
First things first, we need a bash script that with switch between PulseAudio outputs for us. Save the following bit of code to /usr/bin/hdmi_sound_toggle :
#!/bin/bash# Switches between soundcards when run. All streams are moved to the new default sound-card.# $totalsc: Number of sound cards availabletotalsc=$(pacmd "list-sinks"| grep card:| wc -l)# total of sound cards: $totalscif[$totalsc-le1];then# Check whether there are actually multiple cards availableexitfi# $scindex: The Pulseaudio index of the current default sound cardscindex=$(pacmd list-sinks | awk '$1 == "*" && $2 == "index:" {print $3}')# $cards: A list of card Pulseaudio indexescards=$(pacmd list-sinks |sed's|*||'| awk '$1 == "index:" {print $2}')PICKNEXTCARD=1# Is true when the previous card is defaultcount=0# count of number of iterationsfor CARD in$cards;doif[$PICKNEXTCARD==1];then# $nextsc: The pulseaudio index of the next sound card (to be switched to)nextsc=$CARDPICKNEXTCARD=0# $nextind: The numerical index (1 to totalsc) of the next cardnextind=$countfiif[$CARD==$scindex];then# Choose the next card as defaultPICKNEXTCARD=1ficount=$((count+1))done
pacmd "set-default-sink $nextsc"# switch default sound card to next# $inputs: A list of currently playing inputsinputs=$(pacmd list-sink-inputs | awk '$1 == "index:" {print $2}')for INPUT in$inputs;do# Move all current inputs to the new default sound card
pacmd move-sink-input $INPUT$nextscdoneexit
Make our script executable with the command:
sudo chmod +x /usr/bin/hdmi_sound_toggle
Before moving on, confirm the script works as intended. While your HDMI cable is active run the command hdmi_sound_toggle and you should start hearing sound pipe out of the HDMI output.
Next, because PulseAudio is almost always run as a user level daemon, we need something that will move all users' Pulse sessions over to the new output when the HDMI is attached/detached. To do this we create the script /usr/bin/hdmi_sound_toggle_all with the contents:
#!/bin/bashfor dir in/home/*/dodir=${dir%*/}
sudo -u${dir##*/} /usr/bin/hdmi_sound_toggledone
Make this script executable as well:
sudo chmod +x /usr/bin/hdmi_sound_toggle_all
Confirm this script works as well, it needs to be run as root though, so run sudo hdmi_sound_toggle_all while your HDMI is attached - it should switch your output.
Finally, we need to create a udev rule that triggers our scripts when an HDMI cable is attached/detached. To do this we create the file /lib/udev/rules.d/hdmi_sound.rules with the contents:
Note that having the full file path in the execute part is important. So if you placed your scripts somewhere other than /usr/bin like I recommended above - adjust this part accordingly.
You should be good to go, enjoy having audio over your HDMI happen automatically like it should by default. Have any questions, feel free to post a comment below and I'll do my best to help.
A little over three weeks ago I purchased my first Acer C720 Chromebook. That is right - I liked this little guy so much I went and picked up a second copy so my wife and I could each have one.
For most of last year I kicked around a Samsung ARM Chromebook with me - so much of my discussion here will be in comparison to that device since it is still comparable price wise to the Acer C720.
Performance:
I've used dozens of different netbooks over the last few years and I must say the performance of this new Haswell based Intel chip is phenomenal. A dozen browser tabs open, Netflix streaming all while writing an article or two and the little guy doesn't skip a beat.
This thing can do some gaming as well. While it isn't going to run anything at maximum resolution, I've enjoyed the following titles at one point or another on my C720 in the last few weeks:
Left for Dead 2
DOTA 2
Killing Floor
Guild Wars
Elder Scrolls 3: Morrowind
The C720 comes with DDR3 memory in a quantity of either 2 or 4GB.
Look and Feel:
The Acer C720 has a solid plastic case, that is plenty functional. I wouldn't say it is going to win any beauty contests, but it isn't unappealing either:
The dimensions of the C720 are 11.34 x 8.03 x 0.75 inches and it weighs in slightly more than the Samsung at 2.76 pounds. I know many people who are used to only having full size laptops find netbooks a bit on the small size, but personally I find the eleven inch C720 to be the perfect middle ground between a tiny screen like a tablet and fuller size laptops.
Battery & Screen:
The Acer makes up for its slightly heavier weight with a slightly longer batter life. The C720 lasts upwards of eight hours on a full charge. Obviously the exact duration will vary depending on how hard you are hammering the processor and how bright the screen is.
The screen on the C720 is basically identical to every 11" Chromebook with its 1366x768 resolution. Honestly I hope this is one of the things we see an improvement on in the next generation of Chromebooks.
Ports/Connections:
The ports on the C720 are identical to the Samsung Chromebook:
One USB 3.0
One USB 2.0
1/8" audio out
HDMI video/audio out
SD Card Slot
One giant improvement for the C720 though is the location of all of these ports. Unlike the Samsung which crams both USB, the HDMI and the charging port all next to each other on the back of the device, the C720 has USB ports on opposite sides:
Just like the Samsung - the SD card slot on the C720 does not fully encompass an inserted device, meaning you won't want to travel with one inserted:
Version Comparison:
Something you want to be aware of when looking to pick up an Acer C720 is that there are a few different versions of this little laptop you have to choose from. I'm not going to cite any prices here because they seem to fluctuate week to week depending on where you look, but any version of this device you should be able to pick up for under 300 USD.
There are three* different "stock" versions of the Acer C720. Where they differ is the size of their internal storage and memory. The options are:
RAM
Storage
Option One
2GB
16GB
Option Two
2GB
32GB
Option Three
4GB
16GB
*There is also the C720P that has 2GB of memory, 32GB of storage and comes with a touch screen.
The most important thing to note if you do decide to pick up an Acer C720 is that the storage IS user upgradable while the RAM is NOT. That means if you pick up a C720 with 2GB of RAM and decide later you want more - you will need to upgrade the entire unit.
Upgrading the internal Storage (voids warranty):
If you are like me and think a C720 could easily become your day to day computer if it just had a bit more internal storage space then you simply need to upgrade the internal drive. You will simply need to pick up an M2 SSD such as this one on Amazon. Then you can simply follow this instructional video for changing out your SSD:
As someone who has opened up many laptops in his time - I must say that the C720 is very easy to get apart/back together.
OS/Software:
By default the C720 comes with Chrome OS preinstalled - if you are happy with that skip onto the next section.
One of the best things about the C720 though is that Acer has provided it with a version of Coreboot that is able to load into a traditional BIOS in the form of SeaBIOS. This means that if you aren't happy with just Chrome OS you can install a traditional operating system on the device fairly easily.
Honestly I don't see any reason not to put a full OS on the C720. The hardware is more than capable of handling it and installing the latest version of Google's Chrome browser does everything Chrome OS is capable of.
Final Thoughts:
No hardware is perfect and the C720 is not an exception to this rule. It is however a fantastic little PC for the price point that it comes at and I have been very pleased with it thus far. I picked up my C720 with 4GB of RAM refurbished for 190 USD directly from Acer via Amazon, then factor in the 100 USD SSD upgrade and I have a fantastically fast, mobile, PC with a good amount of storage for under 300 USD - not a bad deal.
Do you have a C720? If so what are your thoughts on the device? If you are looking to pick up a C720, but have a question about something I didn't cover above, please feel free to post a comment below asking.